Wednesday, June 15, 2011

Review: HG 1/144 Arios Gundam


Model Number: GN-007
Pilot: Allelujah Haptism
Operator: Celestial Being
Manufacturer: Celestial Being 
Appearance: Gundam 00 (2nd season)
Armaments: GN Beam Saber x 2 (stored in front skirts)
                   GN Beam Shield x 2
                   GN Submachine Gun x 2 (mounted on wrists, MS only)
                   GN Twin Beam Rifle
                   GN Vulcan Gun x 2 (mounted on nose, MA only)


Plane Mode:


Review
I was excited when I start building this kit.  I was curious how it'll transform into a plane.  I did a lot of panel lining as it was too plain orange and white.  The first thing I did after finishing the unit is to change its form and that's when I noticed the flaws in this gundam.  Even if you followed the instructions, it somehow didn't looked like as it was in the picture.   Next while on its gundam form, changing its position was really annoying.  There are parts that easily break off.  It's difficult to position both arms since it couldn't handle the weight in the shoulders.  You should handle this gundam with care because a slight movement of it will lead to parts falling off.  I guess I was expecting too much for a transforming gundam that it turned out to be a disappointment.  

But then, I still like it when it transformed into a plane especially if the head part turns into a pincer.  It could've been better if there isn't much weight bearing part in the shoulders and even in the legs.  The plane doesn't looked balance sometimes.  

I'm not sure if its just the unit that I bought that has a polycap problem.  Overall, without too much handling, the gundam can stand itself uniquely especially if having it on display while on plane mode.  Don't expect much poses and weapons as it only has 2 beam sabers & twin beam rifle.  If you're the type of gunpla builder whose after a gundam that is multi-functional, then this is not for you.  But if you can appreciate simplicity in a gundam (without being bothered by parts falling off), then go for it.

Rating: 3 out of 5

Monday, June 13, 2011

Gunpla Tutorial: Decal Application (Wet Slide)


             On this segment of gunpla tutorial, we'll be talking about decals. The first thing you need to know about decals is that their like stickers, except there are special conditions in applying them to the gunpla. Making use of decals makes a huge difference in a gunpla. There are gunplas that look better with decals, while others are already great with their basic design. Some model kits comes already with a decal, while the others need to be bought separately. There are 2 kinds of decals, the wet slide and the dry transfer. To differentiate the 2, the wet slide is color blue while the dry transfer is color white. For now we'll be focusing on the wet slide and the dry transfer will be discuss on a later post. In comparison to the dry transfer, wet slide decals are much easier to use and preferred by most people. You'll just need to dip it in the water and gently apply it on your desired location. I'll be using the HG 1/144 00 Qan[T] as a test subject. As for the decals, I'm using the general decal for the 00 series. Now let's get started with the gunpla tutorial: wet slide decal application.


1) First, choose a part you want to put a decal.

2) Cut off your desired decal.

3) Fully dip the decal in water.

4) Slide away the decal.

5) Apply the decal on the gunpla part.

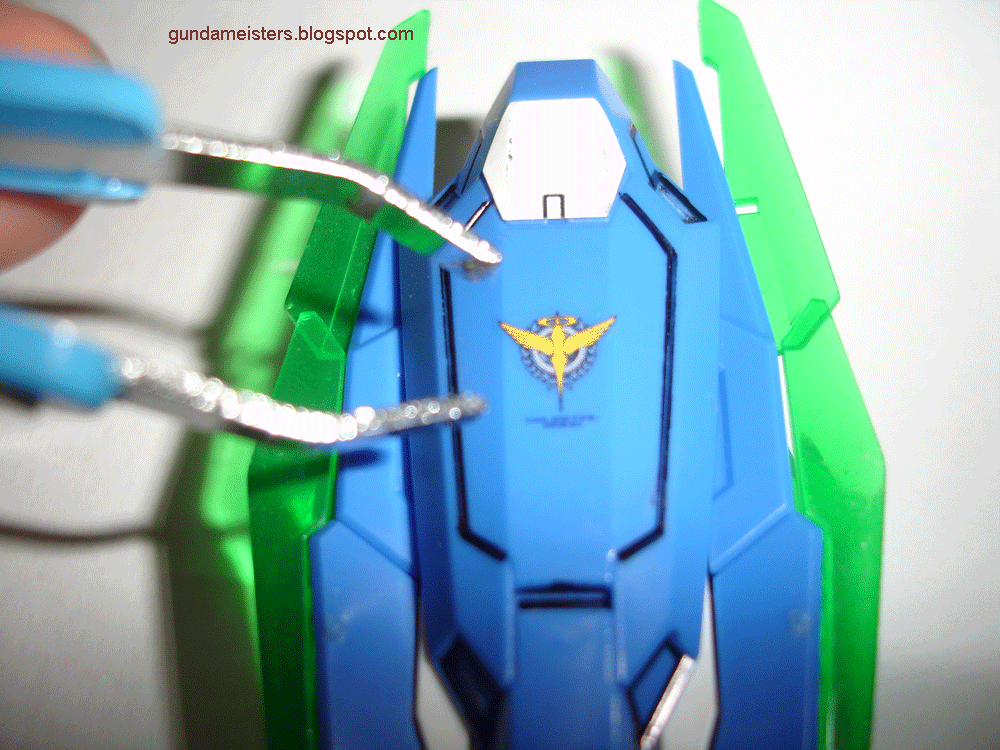
6) Use a cotton swab until it dries.

7) You can use a Mark Setter to make the decal permanent.

                  Now we're finished. Very easy right? Take note that these are not the actual decals for the HG 1/144 00 Qant[T]. I just used a regular gundam 00 decal. If your having trouble deciding on what decal to put on your gunpla, you can always check out other gunpla sites for some guide. This concludes my gunpla tutorial on wet slide decal application. Thank you for reading and I hope you found it useful. Check out also my other gunpla tutorial posts.

.

Saturday, June 11, 2011

Gunpla Checklist: Gundam 0083


                This is a gunpla checklist for the Gundam 0083  series. I made this post to help those gunpla collectors in knowing how many model kits are there in the series and what models are available for each scale. This is a great collection to have, especially if you love the classic gundam series. Theres a PG and a decent amount of MG. It even has some ex models and mobile armors. Every gundam fan should try out these model kits. As of now there are a total of 39 model kits for the Gundam 0083 series. I will update the list if a new model comes out.


1/1700 EX Model (2)
- Arbion
- Arbion (Limited Edition)

1/550 HG Mechanics (3)
- Dendrobium
- Neue-Ziel
- Val-Walo

1/144 NG (7)
#1 Gundam RX-78 GP01
#2 Gundam RX-78 GP02A
#3 Gundam RX-78 GP-01Fb
#4 Gundam RX-78 GP03S
#5 Gerbera Tetra
- Kampfer
- Gundam NT-1

1/144 HGUC (15)
#13 Gundam RX-78 GP01
#16 Gelgoog Marine
#17 Dom Tropen
#18 Gundam GP01Fb
#26 Gelgoog Marine (Cima Custom)
#27 Dom Tropen (Sand Brown)
#28 Dendrobium
#66 Gundam RX-78 GP02A
#67 Powered GM
#74 GM Quel
#105 F2 Zaku (Zeon Ver.)
#107 F2 Zaku (E.F.F. Ver.)
#113 GM Type C
#120 GM Custom
- GM Cannon II

1/100 MG (11)
- Gundam RX-78 GP01
- Gundam RX-78 GP01-Fb
- Gundam RX-78 GP01-Fb (Coating Ver.)
- Gundam RX-78 GP02A
- Gundam RX-78 GP02A (Coating Ver.)
- Gundam RX-78 GP03S
- GM Custom
- GM Quel
- Zaku II F2
- Zaku II F2 (E.F.S.F. Color)
- Gelgoog (Gato Custom)

1/60 PG (1)
- Gundam RX-78 GP01/Fb


.

Wednesday, June 8, 2011

Gundam Cafe in Akihabara


Gundam Cafe was opened last April 24, 2010 in front of Electric Town exit at the Akihabara station.  It's a place for entertainment, information center for the latest news in Gunpla and display new items.


The cafe was made official by Mr. Ueno Kazunori, Bandai's President Chief Gundam officer.


Gundam fans and even newbies to the Gundam world will be served by waitresses wearing the Earth Federation female soldier uniform.  Isn't that cool? It's an added plus to the Gundam themed atmosphere, as if you're really part of that era.


The menu consists of 30 drinks and 35 types of food which are named after character references and elements from the Gundam series.  It's interesting how the presentation of the food turned out to be.  Look at that haro face! Not only you'll feel full as you dine in here but you'll also enjoy how it looks like, I'm sure you'll pull out your camera right away before eating it.


Here's the list of some food and drinks:


  • Jaburokohi - 340 yen (tax included)
  • 190 yen Gundam sauce grilled Hokkaido Kokura (including tax) / 220 yen bacon mayonnaise (approx.)
  • Federal white guy - 890 yen (tax included)
  • Red Comet - 790 yen (tax included)
  • Pickles - 380 yen Zaku (approx.)
  • Gandamuharopitsutsa - 590 yen (tax included)
  • Red Comet - 790 yen (tax included)
  • Blue Giant - 790 yen (tax included)
  • Mono eye - 790 yen (tax included)
  • Sara's lips - 790 yen (tax included)  (hmm... sounds heavenly)

Other than the menu, here are the original cafe items for sale.


  • Gundam Cafe Doll-shaped Cake (6 pieces) - 680 Yen (inclusive of tax).
  • Weak Person's Rice Crackers (6 pieces) - 550 Yen (inclusive of tax). 
  • Jaburo Coffee (200g) - 980 Yen (inclusive of tax).
  • Haro Crunchy Choko (9 pieces) - 680 Yen (inclusive of tax). 
  • Famous Lines Cookies (8 pieces) - 550 Yen (inclusive of tax).
  • Gundam Cafe Cheeze Pie (20 pieces) - 800 Yen (inclusive of tax).
  • Gundam Cafe Ash Tray - 735 Yen (inclusive of tax).
  • Gundam Cafe Coaster (6 random pieces) - 380 Yen (inclusive of tax).
  • Gundam Cafe Deco Metal 01 Gold - 500 Yen (inclusive of tax).
  • Gundam Cafe Print Guard 01 Sensai 3.2 Yen (inclusive of tax).


The freshly baked Gunpla-yaki is not sold in the store but through the voucher system.  This looks tasty! How did they even baked that form?


The hexagon neon signs and tiles with Mr. Yoshiyuki Tomino (director), Mr. Kunio Okawara (mecha design) and Mr. Yoshikazu Yasuhiko (character design) signatures.


 Promotional video monitors.

and the next part that is worth viewing is the...


Washroom area.  Char's customized zaku is designed for the ladies room.  It'll be so cool to be actually in it instead of viewing the picture.  The "push start button" is making me curious.  Sorry Zeon male fans, no entry!


Before leaving the place, don't forget to stopped by this area to buy original products.  Great for gifts and collections.

This is going to be included in my Japan wishlist.  It's not like you get to have this kind of cafe in other countries so it's worth visiting.

To those who are in Japan and viewing this blog, please tell me about it in the comments section.  Thanks! 

Information and images from  Gundam dot info


Monday, June 6, 2011

Review: HG 1/144 - GN Sword IV Full Saber


                  At last I finally got my hands on the GN Sword IV Full Saber. I was forced to buy the the Feb., 2011 issue of Hobby Japan magazine just to get this. But its all worth it. Just by looking at the box will set your expectations on how awesome this sword is gonna be once you put it in the Qan[T]. The box may seem big. But once you open it you only see two small runners. A blue and a clear green runner. The instruction on how to build the sword is inside the magazine. This sword is very plain once you finish it. So you'll want to do some modifications to make it look even cooler. The magazine also includes some tips on how to customize the GN Sword IV. You could get it's decals by buying the Hobby Japan magazine March, 2011 issue. But what I did is, I put some white mark details and some black panel lines. It's not much but its definitely better than the simple blue color. I'm still thinking if I should buy the March, 2011 issue just for the decal. Probably I'll just make use of the general HG gundam 00 decals instead. In the end, it's really up to you on how to handle the designs.

Hobby Japan magazine (Feb., 2011)

Instruction on how to build the GN Sword IV

Back of the box

The GN Sword IV is composed of blue parts

Green clear parts for the blades

Parts completed

GN Sword IV

Variations of the GN Sword IV
Attach on Zabanya's  GN Sniper Bits

Attach on Harute's tip during plane mode

Review:

                 There are a lot of great stuff you can do with the GN Sword IV. You could either hang it beside the Qan[T]'s shoulder or use it as a weapon. While in weapon mode, you can detach the sword to make a short sword and daggers. Try to experiment on your own to see other possible variations. Other than the Qan[T], the GN Sword IV can also be used by the other gundams from the 00 movie. You can hang the three blades on Zabanya's GN Sniper Bits. The Harute can attach the blades to it's tip and wings while on plane mode. Lastly, the Raphael's backpack arm can hold on to the daggers. Overall, I love the GN Sword IV. It makes the Qan[T] more complete. By adding the GN Sword IV, V and GN Sword Bits, the Qan[T] now has a total of 11 blades. Just imagine the cool poses you could do with it. If you have a HG 1/144 Qan[T], I totally recommend you get this. It's really worth it. Well thats about it for the GN Sword IV. Thank you for reading and I hope you found my review useful. Check out also my other posts about HG gunplas.

Rating: 5 out of 5

.

Saturday, June 4, 2011

Gunpla Checklist: V Gundam


               This is a gunpla checklist for the V Gundam  series. I made this post to help those gunpla collectors in knowing how many model kits are there in the series and what models are available for each scale. The V Gundam is a decent gunpla series to collect. Most of the model kits are in 1/100 and it even has a 1/60. As of now there are a total of 24 model kits for the V Gundam series. I will update the list if a new model comes out.


1/144 NG (13)
- V Gundam
- V-Dash Gundam
- V2 Gundam
- Gun EG
- Gun Blastor
- JamesGun
- Abigor
- Jaberin
- Shaitan
- Rig Shokew
- Contio
- Tomriat
- Zoloat

1/100 HG (7)
- Victory Gundam
- V-Dash Gundam
- V2 Gundam
- V2 Buster Gundam
- V2 Assault Gundam
- Zollidia
- Gun Blastor

1/100 MG (3)
- V Gundam (Ver. Ka)
- V-Dash Gundam (Ver. Ka)
- Core Booster (Ver. Ka)

1/60 (1)
- V2 Gundam


.

Wednesday, June 1, 2011

Gundam Cosplay: Strike Freedom


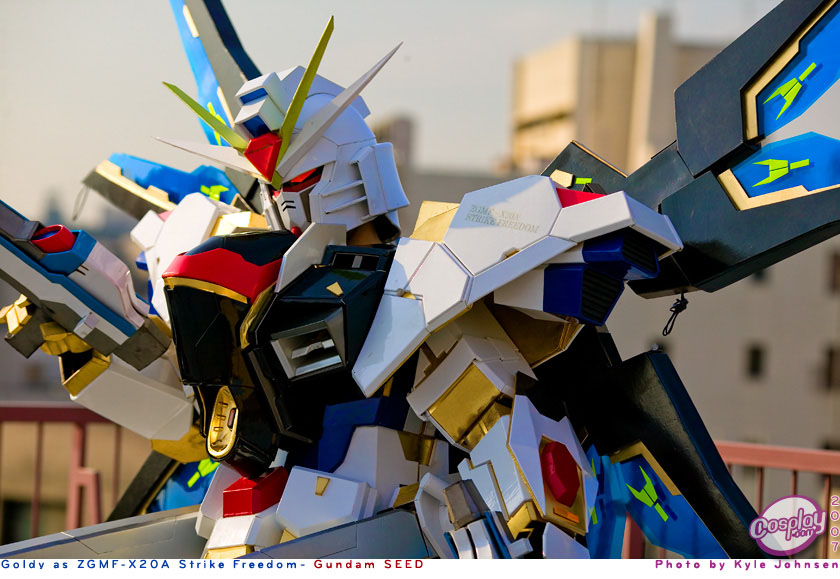
               I'm a big fan of gundam and cosplay. That is why I'm so amazed when I saw a cosplay of the Strike Freedom. This is the best gundam cosplay I've ever seen. It's equipped with beam rifles and everything is fully detailed. You can clearly see the effort that was put into making this costume. I can't imagine how long it took to complete this. It's truly the work of a genius. Hopefully we'll get to see more great gundam cosplays such as this.


Image Source:
photo.mmosite.com
Related Posts Plugin for WordPress, Blogger...